
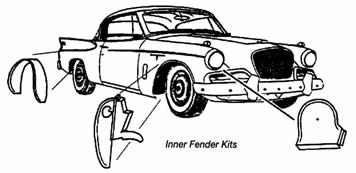
10-piece fender kit is developed to fit all '53 or later Coupes & Hawks.
- Formed in 20 gauge steel.
- Instructions included.
- None of our panels are cosmetically coated. Click here to find out why.
- Made in the USA
INNER-FENDER INSTALLATION KIT INSTRUCTIONS If an inner-fender kit had been installed on your Stude in the factory your car would probably not rusted out in the first place. A pity. Your new kit will protect a lot of your hard restoration work or will keep your Stude from rusting in the usual places. You may have noted our kit does not look like much in the box. But it will look great once installed. Have faith. In order to prevent fasteners from being attached to the outer face of your fenders, all panel edges must simply be butt fitted against the inner surface of your fenders and be adhesive calked into place. (use adhesive calk, silicone calk or a good quality rubberized calk which can be purchased at your local lumber yard or hardware store. At first glance the aforementioned butt fit set up may seem tacky but it isn’t really. We have tried various rubber seals but have found the butt fit is the best. After proper instillation our kit will be quite solid and look good as well. It is best to clean all inner-fender areas thoroughly and undercoat as is appropriate. You should remove and thoroughly clean your vent shrouds which will give you more room for inner fender cleaning. Sandblasting works the best for cleaning as it provides you with the best surface for undercoating. Note that the previous undercoating will effect the fit of your fender kit. Install your rear fender kit first as it is the easiest.
Remove the lower rear fender brace bolt and slide the fender kit flange between the brace and fender. Vice grip into place. Fit the rear fender panel first allowing for the closest panel to outer fender fit possible. In all cases our panels should be close to 90 to the outer fender panel. Deviance from 90 will seriously effect the panel to fender gap. Drill and rivet, one hole at a time, beginning at the bottom of the arc of the wheel well area and work around and upward spacing your rivets at approximately 6 inch intervals. Once that has been done drill and rivet between existing rivets so as to draw up all gaps. You may wish to use drill out and set new rivets from the top of the trunk well area in order to improve the appearance of your job. Be sure to drill out rivets and replace them one at a time. Be sure to de-burr your drilled holes so the head of the rivet fits flat against your metal. Calk and undercoat as is appropriate. Be sure to let the calk cure properly before applying undercoat. Install your headlight grill and shelf panels next. Align panel and set your center rivet into the headlight housing Rivet, calk and undercoat as is appropriate. Piece of cake. Now for the tougher part. The rear of the front fender kit is made in two parts per side. Remove the fender braces. Note that the lower brace uses a self-tapping bolt at the top. Keep the brace in place and replace the self-tapping bolt with a stove bolt. It will cut its own threads if installed patiently. Secure the top of the brace snugly enough to accept a nut that will not unscrew the stove bolt in the tightening process. Tap the bottom of the back brace out of your way. Fit the outer panel kit into place noting the vertical angle of the panel is to be art approximately the same angle as the fender edge opening Attach your panel to the protruding stove bolt and secure lightly with a nut and washers. Make sure the panel fits tightly against your fender and drill a hole into your heater blower support. (Be sure to remove all undercoating under the tab area of the support first). Install a self tapping body bolt. Pop rivet blower hole tab back into place. Tighten all securely. Remove the upper blower mount bolt. Fit second panel, replace bolt, and tighten lightly. Remove the lower staples from the rubber splash guard and slide the lower portion under of the panel under the apron. Align the kit panel and pop rivet to the previous panel. Drill and rivet into the inner apron area. You may need to hammer form all tabs for a closer fit before securely riveting. Note that the inner panel is to overlap the outer panel. You may wish to drill out some rivets in the inner apron area and replace them one at a time from the engine side of the apron so as to give it a neater appearance. Tighten all bolts securely. Modify and re-install your upper fender brace. Undercoat and calk as is appropriate. (Note that you will have to remove and discard the lower splash panel from the drivers side before installing your kit on that side.
CONGRATULATIONS!! You have done what South Bend should have done in the first place. I told you your kit would look great when finished. Celebrate and be proud of yourself
ADDENDUM It should be noted that all panels are oil coated. Always degrease with a proper solvent, etch with common vinegar, or commercial metal etch before calking or undercoating. A properly etched metal will have a dull finish. It should be likewise noted that previous fender dents or original undercoating will effect the fit. You may thus wish to trim our panels to fit your needs. Beware—our panels are cut quite precisely although our angles may need to be modified by you. Make sure trimming is absolutely necessary before getting out the snips. You may wish to use metal screws to draw up any serious gaps before riveting.